6/26/2012

SharePoint: Search and Replace in Content Editor Web Parts


If you are interested in the use of these types of PowerShell scripts to explore and audit SharePoint then you may want to attend my “Exploring and Auditing SharePoint Using PowerShell” session at SharePoint Saturday Dayton this Saturday.


There’s a question in the MSDN SharePoint forums about how to update Content Editor Web Parts in hundreds of web part pages. These web parts had URLs that pointed to a server that had been renamed, and to fix the URLs meant updating all of these Content Editor Web Parts.

I had recently written a little script to find all of the Content Editor Web Parts in a farm that had a certain piece of text. It only took a small edit to add some code to find and replace text. I have posted the script here instead of the forums as I plan to return here to clean up the code a bit and add more comments.


As this script will change, and possibly break, your Content Editor Web Parts… what's below is provided with no warranties and is up to you to test to confirm that it is safe!


Steps:

  1. Paste the following into a NotePad file and save as CEWPsearchandreplace.ps1 (or any name you like)
     
  2. Edit these two lines with your before and after text:
        $textToFind = "theBeforeText"
        $newText    = "theAfterText"
     
  3. Start the SharePoint 2010 Management Shell and type: 
          . c:\whereyousavedit\CEWPsearchandreplace.ps1
    Note the dot and the space before the C:

Note that you will need appropriate PowerShell and SharePoint permissions to run this script. See here for more info on permissions: http://techtrainingnotes.blogspot.com/2011/08/searching-and-auditing-sharepoint-with.html


Code Notes:

  • The code creates three functions:
    Get-SPWebPartsForWeb  yourURL                (for a single site)"
    Get-SPWebPartsForSite  yourURL                 (for all sites in a site collection)"
    Get-SPWebPartsForApplication  yourURL    (for all site collections in an app)"
     
  • The code only checks for web part pages in selected libraries: "Site Pages","SitePages","Pages"
    You can edit the $librariesToCheck variable to add more locations
     
  • The code also checks the default.aspx page in the site root if $checkrootdefaultaspx = $true
     
  • There are a number of commented out “Write-Host” lines that you can uncomment for debugging purposes.

The code:

"Find and Update Content Editor Web Parts loaded..." 

"Run using:"
"  Get-SPWebPartsForWeb  yourURL         (for a single site)"
"  Get-SPWebPartsForSite  yourURL        (for all sites in a site collection)"
"  Get-SPWebPartsForApplication  yourURL (for all site collections in an app)" 

#  Change these two variables
$textToFind = "theBeforeText"
$newText    = "theAfterText" 

$librariesToCheck = "Site Pages","SitePages","Pages"
$checkrootdefaultaspx = $true 

function Check-Page($page)
{
        # borrow a .NET method GetExtension
        if ([system.io.path]::GetExtension($page.url).ToLower() -ne ".aspx")
        {
          continue #not a webpart page, so back to the foreach
        } 

        # try and get the WebPartManager for the page
        $wpm = $null
        try
        {
          $wpm = $page.GetLimitedWebPartManager([System.Web.UI.WebControls.Webparts.PersonalizationScope]::Shared)
        #"    Webparts: " + $wpm.webparts.count
        }
        catch
        {
          #"   Not a web part page"
        } 

        if ($wpm -ne $null)  # then we have a webpart page
        {
          Write-Host "    Page: " $page.Url 

          # report each web part found
          foreach ($webpart in $wpm.webparts)
          { 

            Write-Host "      Web part: " $webpart.WebBrowsableObject.ToString().Replace("Microsoft.SharePoint.","") -foregroundcolor blue
            Write-Host "         Title: " $webpart.Title
            if ( $webpart.WebBrowsableObject.ToString() -eq "Microsoft.SharePoint.WebPartPages.ContentEditorWebPart" )
            { 

              # if there's linked content then open and search for the script tag
              if  ($webpart.contentlink.length -gt 0 )
              {
                $file = $w.GetFile($webpart.contentlink)
                $b = $file.OpenBinary()
                $encoding=new-object "System.Text.UTF7Encoding"
                if ($encoding.GetString($b).toLower() -match "<script")
                {
                  Write-Host "         contentlink: HAS <SCRIPT>" $webpart.contentlink -foregroundcolor red
                }
                Remove-Variable b
              } 

              # else report what's in the content
              elseif ($webpart.content."#cdata-section".tolower() -match "<script")
                {
                  Write-Host "         content: HAS <SCRIPT>"  -foregroundcolor red 

# write-host $webpart.content."#cdata-section" -foregroundcolor green 

$xmlDoc = New-Object -TypeName xml
$xmlElement = $xmlDoc.CreateElement("MyElement"); 

# THIS IS WHERE THE REPLACE IS DONE.
$xmlElement.InnerText = $webpart.Content.InnerText.Replace($textToFind, $newText); 

$webpart.content = $xmlElement 

$wpm.savechanges($webpart) 

                }
            } 

          }
        } 

} 

filter Get-WebPartPages
{
  # this filter accepts a SPWeb and returns SPPages from target libraries 

# write-host "getting webparts"
  $w = $_
  #Write-Host ""
  #Write-Host "Web: "  $w.ServerRelativeUrl #-foregroundcolor yellow 

  if ($checkrootdefaultaspx)
  {
    #Write-Host "  Root: default.aspx"
    foreach ($file in $w.files)
    {
      if ($file.url -eq "default.aspx")
      {
        $file
      } 
    }
  }
  # Write-Host "now for lists..................." $w.lists.count
  foreach ($list in $w.Lists)
  {
      #Write-Host "  List: " $list.title $librariesToCheck $("'" + $list.title + "'")
    if ( $librariesToCheck -like "*'$($list.title)'*" )
    {
      #Write-Host "File name " -ForegroundColor red
      foreach ($item in $list.items)
      {
        #Write-Host "File name " $item.file.url -ForegroundColor red
        $page = $item.file 

        $page
      }
    }
  }
} 

function Check-WebParts($w)
{ 

  Write-Host ""
  Write-Host "Web: "  $w.ServerRelativeUrl -foregroundcolor yellow 

  if ($checkrootdefaultaspx)
  {
    Write-Host "  Root: "
    foreach ($file in $w.files)
    {
      if ($file.url -eq "default.aspx")
      {
        Check-Page($file)
      } 
    }
  } 

  foreach ($list in $w.Lists)
  {
  Write-Host ("'" + $list.title + "'")
    if ( $librariesToCheck -contains $list.title )
    {
      write-host $list.title
      foreach ($item in $list.items)
      {
        $page = $item.file 

        Check-Page($page)
      }
    }
  } 

} 

Function Get-SPWebPartsForWeb($url)
{
  $web = Get-SPWeb($url)
  Check-WebParts($web)
  $web.Dispose()
} 

Function Get-SPWebPartsForSite($url)
{
  $site = Get-SPSite($url)
  foreach($web in $site.AllWebs)
  {
    Check-WebParts($web)
    $web.Dispose()
  }
  $site.Dispose()
} 

Function Get-SPWebPartsForApplication($url)
{
  $app = Get-SPWebApplication($url)
  foreach ($site in $app.sites)
  {
    foreach($web in $site.AllWebs)
    {
      Check-WebParts($web)
      $web.Dispose()
    }
    $site.Dispose()
  }
}


.

6/25/2012

SharePoint Saturday Dayton 2012 this Saturday!


It's less than a week to the very first SharePoint Saturday Dayton event. Twenty sessions and twenty speakers means that there's something for everyone… admins, devs, site owners, business owners, and end users. Oh, and don't forget SharePoint Saturday Louisville and SharePoint Saturday Cincinnati coming up in July and October.

It's almost full! Register now or be sorry!

spsdaytonbadge

My Topic: Exploring and Auditing SharePoint Using PowerShell

This session shows how to use PowerShell in both SharePoint 2007 and 2010 to find and extract all kinds of information not easily found using built-in features.  In this session you will see how to use PowerShell to:

• Find all documents in any site, or the entire farm, that matches a pattern (example: *.avi)
• Find all users who have access to a particular file (or folder, or library or site)
• Find sites with no recent activity
• Find all content a single user has access to
• Find all libraries that use a selected Content Type
• Find all customized (un-ghosted) pages
• Find all pages that use a selected web part
• How to collect the results into reports
• and more…

SharePointSaturdaySmall

Reasons to attend SharePoint Saturday Dayton:

  • It's free
  • It's educational
  • You can visit with (and thank) the sponsors
  • It's free
  • There's sessions for everyone
  • You can hobnob with the experts (and maybe get some free consulting)
  • There's door prizes
  • It's air-conditioned
  • It's near by
  • I'm speaking there! (ok, there are better reasons to attend…)
  • Did I mention it's free?

Sessions, speakers, directions and registration can be found here:
http://www.sharepointsaturday.org/dayton/default.aspx

Stay up with SPS Dayton news by following: @spsdayton

Speakers and Sessions:

Visit the site for full session descriptions

6/22/2012

SharePoint Saturday Dayton 2012 in One Week!


It's less than a week to the very first SharePoint Saturday Dayton event. Twenty sessions and twenty speakers means that there's something for everyone… admins, devs, site owners, business owners, and end users. Oh, and don't forget SharePoint Saturday Louisville and SharePoint Saturday Cincinnati coming up in July and October.

It's almost full! Register now or be sorry!

Reasons to attend SharePoint Saturday Dayton:

  • It's free
  • It's educational
  • You can visit with (and thank) the sponsors
  • It's free
  • There's sessions for everyone
  • You can hobnob with the experts (and maybe get some free consulting)
  • There's door prizes
  • It's air-conditioned
  • It's near by
  • I'm speaking there! (ok, there are better reasons to attend…)
  • Did I mention it's free?

Sessions, speakers, directions and registration can be found here:
http://www.sharepointsaturday.org/dayton/default.aspx

Stay up with SPS Dayton news by following: @spsdayton

Speakers and Sessions:

Visit the site for full session descriptions

.

6/21/2012

SharePoint: Hide a web part for selected users


"Out of the box" there are no "deny permission" features in SharePoint, only grant permissions. If you have a group called Sales with 1000 users, and you would like to use the SharePoint Audience feature to display a web part for everyone in Sales except for Sam, Susan and Bob, you will have to create a new group with 997 users named "Sales except for Sam, Susan and Bob" (and then maintain two groups going forward. But there is a way…

Here's a trick that starts by using a Content Editor Web Part to hide another web part from everyone. By creating a group with our three problem people and using that as an Audience for this CEWP we can selectively hide another web part. 

Before we start, Audiences are not available in WSS 3.0 (2007) or SharePoint 2010 Foundation.

For this trick you need to do four things:

  • Create the group or audience of people to hide things from
  • Discover the ID of the web part you want to hide (see here for 2007 and 2010)
  • Write a bit of CSS to hide the web part
  • Add a Content Editor Web Part to hold or link to the CSS and audience filter it


Create the audience:

Your audience can be any AD group (Distribution/Security Group), any SharePoint group you create or a custom audience (Global Audiences) created by your server administrator. For testing proposes you make want to create a test SharePoint group named "TheNoSeeGroup".

The CSS:

The CSS is quite simple, just a "display:none" to hide the entire web part. As this will placed in a Content Editor Web Part that will only be seen by the "TheNoSeeGroup" this CSS will only be effective for those users. The trick here is to get the ID of the web part you want to hide.

    image

Discovering the ID of the web part to hide:

Go to the page with the web part to hide (such as Shared Documents) and use your browser's View Source option to see the page's HTML. Do a search for MSOZoneCell_WebPart and browse around to see if there's any hints that your found the right web part. If not, search again. For more help, go her for 2007 and here 2010. The ID will look something like MSOZoneCell_WebPart9. Note that if you delete and re-add the web part it may receive a new number.


Steps:

  1. Find your web part's ID  (MSOZoneCell_WebPart1, MSOZoneCell_WebPart2, etc)
  2. Open Notepad and add the CSS from above using your web part's ID
  3. Save the Notepad file and upload to a SharePoint library in your site (I used Site Assets and named the file HideWebPart.htm)
  4. Go to the library where you loaded the file, right-click the file and select Copy Shortcut (or better, right-click the file, click Properties and copy the URL from there)
  5. Go to the page with the web part you want to hide, edit the page and add a Content Editor Web Part (CEWP) above the web part you want to hide
        image
  6. Edit the CEWP and paste the URL copied earlier for the CSS Notepad file
        image
  7. Click OK… The Shared Documents web part should now be hidden (from everyone!)
  8. Edit the Content Editor Web Part again
  9. In the web part's properties panel expand the Advanced section, scroll to the bottom and select the audience to hide the web part from
        image
    Note that in 2010 the text box has no visible border!
          image
  10. Save your changes and test by have a group member, and a non-group member, log in and see if the web part is displayed.

Note for 2010: If you can't see the CEWP when you edit the page (to edit it or to delete it) it's because you are not in the right group! Either add yourself to the "hide from" group or use a trick from here to display a list of all of the web parts, append ?Contents=1 or &Contents=1 to the end of the page's URL.

.

6/19/2012

SharePoint: Group By on more than 2 columns in a view (SP 2010)


An expanded version of this article, along with many other customization examples and how-tos can be found in my book, SharePoint 2007 and 2010 Customization for the Site Owner.


This is an update of an article written for SharePoint 2007. Many of the steps are the same in both 2007 and 2010, but both the SharePoint Designer steps and the default web part used for views have changed.

Group By on more than 2 columns in a view

In my SharePoint classes I have often been of asked how to group on more than two levels in a view. I have always given the quick answer of "use SharePoint Designer"!
But, some of you have asked "How?". You may be sorry you asked… but here goes…

Goals:
  • Create a view with nested groups deeper than just 2 levels
  • Put the counts and totals at the bottom of each section.
  • Do the above with no custom web parts, custom XSLT or anything that has to be deployed to the server.
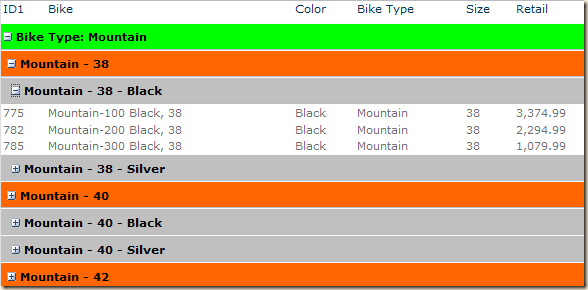
Sample:
   image

Secrets and Tricks needed:
  • It can't be done "out of the box" in the browser
  • SharePoint Designer is needed to make the edits
  • You need to convert the view web part to a SharePoint Designer Data Form Web Part
  • You need a Sort and Group secret
  • You need to fix the footer rows
  • You need to manually add your totals, averages, counts etc.
Warning!
SharePoint 2010 does not consider a page with a Data From Web Part to be a “view”. It only believes that a page is a “view” when it has an “Xslt List View Web Part”.  In 2007 we could create a new view, edit it in SharePoint Designer as much as we wanted, and it was still a view. In 2010, SharePoint will not recognize a page without a XsltListViewWebPart as a view.
So before you start…
  • If you just need a page with your list nicely grouped, it may be best just to create a web part page and store it in a library.  Then add the Data Form Web Part using the steps below.
     
  • If you want the page to be treated as a view, leave the XsltListViewWebPart on the page, but make it hidden. Then add the Data Form Web Part below the existing web using the steps below.
    • In SP 2010, a view page with an added web part introduces a bug or two. The ribbon will not be displayed. The view dropdown in the page title area will be missing the dropdown to select another view.
 
My Example:
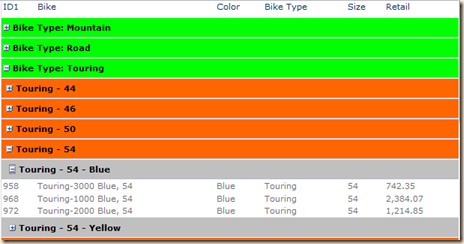
  • I have a simple list (actually imported from Excel) with these columns: ID1, Bike, BikeType, BikeSize, BikeColor and Retail (price).
  • I want to group this on BikeType, BikeSize, BikeColor and count the items and sum or average the price in each group.

Create a new Standard View from the list's view menu.  
                Don't bother with any options as we are just going to delete the default list web part. 

               Or just create an empty web part page. (see “Warning” above)


The “before” – just a standard view with selected columns:
     image
If using an existing view page:
  • Open your site with SharePoint Designer and click the Lists and Libraries node in the Site Objects pane
  • Click your list (“Bikes” in my example)
  • Click your view you created earlier (“Grouped” in my example)
Otherwise create a new web part page in a library

  • Notes (background only, you can skip this):
    • The view is now being displayed using a XsltListViewWebPart  (It was a ListViewWebPart in SP 2007) and can only be customized with the same options as found using a browser ("Modify View")
       
    • The XsltListViewWebPart  has the same grouping limitations and the ListViewWebPart (2 levels of grouping)
       
    • For more info on what has changed from the 2007 ListViewWebPart and the XsltListViewWebPart see http://msdn.microsoft.com/en-us/library/ff806162.aspx and http://msdn.microsoft.com/en-us/library/ff604021.aspx
       
    • SharePoint Designer 2010 has two web parts for lists:
      • XsltListViewWebPart  - this is the web part used when you create a new View
      • DataFormWebPart – created from SharePoint Designer using Insert, Empty Data View
    • SPD 2010 adds a bit of confusion when trying to add a “Data View”
      • When you click Insert, (pick an existing list) SPD inserts an XsltListViewWebPart
      • When you click Insert, Empty Data View SPD inserts a DataFormWebPart


  • If starting with an existing view, delete or hide the existing web part.
    • Delete: In the Design window click in the web part, click the WebPartPages:XsltListViewWebPart tab, press the Delete key
      or
      in the Code window select the entire <WebPartPages:XsltListViewWebPart tag (including the start and end tags) and delete the code
       
    • Hide: In the Design window click in the web part. In the Ribbon in the List View Tools section click the Web Part tab and then click Properties. In the Layouts section of properties click Hidden

  • Insert an Empty Data View Web part
    • Click the Insert Ribbon tab and click the Data View button
    • Click Empty Data View
    • In the new web part click “Click here to select a data source”
    • Click your list and click OK (this will open the Data Source Details Pane)
    • Select the columns you want in your list (click a field, then Shift-click each additional field)
    • Click the “Insert Selected Fields as” button and click “Multiple Item View”

Note: If you followed the earlier article for SharePoint 2007, the rest of the steps are pretty much the same.

Note: the view is now being displayed using a DataFormWebPart and:
  • is no longer a “View” and can not longer be modified from the browser
  • can be customized from SharePoint Designer,
  • from the browser you can only rename the view,
  • from the browser you can also use Site Actions, Edit Page, Modify Shared Web Part to hand edit the XSLT,   ;-) 
  • going forward, columns added to the list will not be automatically added to the DataFormWebPart. You will need to use SharePoint Designer to manually add the columns to the “view’. 
Save! At this point you may want to click Save and review the results so far in a browser. Review the formatting and note the things you need to change. 
  • Edit the Data View Web Part
  • Click the web part and note that you now have Data View Tools section in the SharePoint Designer ribbon.
    image
     
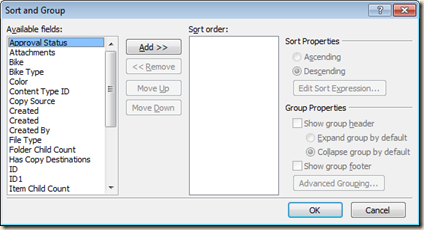
  • Click “Sort and Group”
    image
  • Remove any sort fields that may already be in the Sort Order column

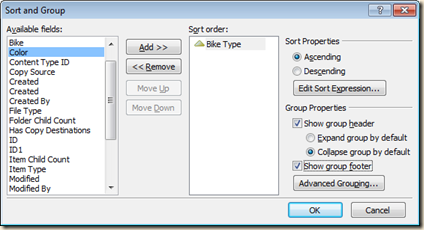
Add your top most group:  
    • Click the field (BikeType) and
    • Click Add
    • Click “Show group header”
    • Click “Collapse group by default” (optional)
    • Click “Show group footer” (if you want counts and totals)

      image

Add your second group by clicking the field (Example: Size) and clicking Add.

  • If you stop here you will have groups, but all of your counts and totals will be wrong! We need to create both the text to display for the group and a hierarchy for the grouping. At the second level of our grouping we need to group on the combination of both columns, “Bike Type” plus “Size” 
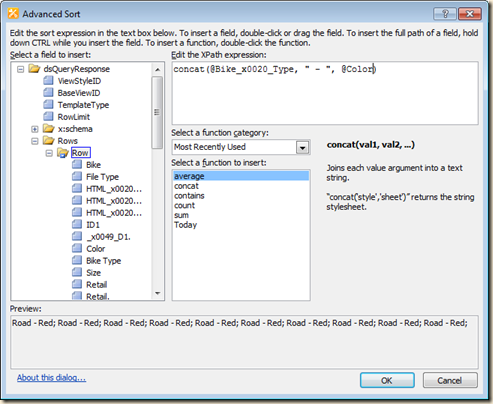
  • Click “Edit Sort Expression”
    • At a minimum you will need to concatenate the current grouping column with the previous grouping columns, and while you are at it you can add some “pretty” formatting:
    • Enter: concat(@Bike_x0020_Type, " - ", @Size)  (Watch the capitalization!  Use the exact name the Intelisense offers – spaces are “coded” so “Bike Type” is “Bike_x0020_Type”.)
    • Note the preview at the bottom of the dialog box…
      image
       
    • Click OK
    • Click Show group header
    • Click Collapse group (optional)
    • Click Show group footer (if you want counts and totals)

  • For the third and following groups - repeat the step above with Sort Expressions similar to:
    • concat(@Bike_x0020_Type, " - ", @Size, " - ", @Bike_x0020_Color)
    • More columns?  In each new group include all of the fields from the previous groups along with any separators you like:
      concat(@group1field, @group2field, @group3field, @group4field, @group5field, etc)
      or concat(@group1field, " - ", @group2field, " - ", @group3field, " - ", @group4field, " - ", @group5field, etc)
    • If you could see the full width of these you would see:
      image 
  • Before clicking OK to leave this dialog box, check the order of the groups. They have probably gotten changed.  (bug?)
    • Make sure they are in order something like:
      @BikeType
      concat(@Bike_x0020_Type, " - ", @Size)
      concat(@Bike_x0020_Type, " - ", @Size, " - ", @Bike_x0020_Color)
    • Recheck each of the sort levels to see if these are still checked:
      • Click Show group header
      • Click Collapse group (optional)
      • Click Show group footer (if you want counts and totals)
  • Optionally add one more column just to sort the data within the last group. Do not turn on the group header or group footer options for this sort-only field.
  • Click OK to close the Sort and Group dialog box.
     
  • You will probably want to change the Paging options as they default to 10 items.  Click the Paging button in the Ribbon (Data View Tools group, Option tab)
     
  • Tip: If you have a lot of data in the list SharePoint Designer can get really slow. There are two things you could do here, set paging to a small number (not so good for testing multi-level grouping) or from the Common Control Tasks select Show With Sample Data.
    image
  • If you want grand totals you will also need to click Data View Properties and check Show View Footer.
  • Save! At this point you may want to click Save and review the results so far in a browser. You should now have all of your groups. 
                             
                Click the + to expand a section.
  • Now is a good time to clean up the formatting such as the gray background and odd row height in the group header and footer rows. (Right-click in the row in Design view and select Cell Properties.

                      (click for bigger view) 
                      image
  • Your grouping work is now done. The following steps are only needed if you want to add totals, counts, averages, etc.
  • Now for totals!
    • These steps describe adding totals to the footer rows, but also apply to modifying header (top of each group) rows.
    • The Data View sets up the header and footer rows as a single cell with a column span of 99! To display totals in the same columns and the data you will need to fix these rows.
    • You will need to fix each of the group footer rows plus the view footer row.
  • In the Code View do a search for "colspan="99"". In my example there will be seven of these, one for each grouping footer, one for each grouping header and one for the view footer.
  • Now you need to do a little planning. In my example I'd like to put the "Count=" in a two column spanned cell under the ID and Bike columns. Then I would like to have one cell under each additional column. So something like: <td colspan='2'>count stuff</td><td></td><td></td><td></td><td>total goes here</td>

    Total boxes

    Steps:
    • Find "colspan="99"" for the first group footer row. (Tip: Did you find a header or footer row? Look up two lines and you should see "<xsl:if test="$showheader"" or "<xsl:if test="$showfooter""!)
    • Change the 99 to 2
    • Find the end tag for the cell (</td>) (down about 16 lines of html)
    • After the end tag add the other cells (TD tag pairs), one for each additional column (I need four more)
      <td></td> <td></td><td></td><td></td>
  • Now to add the total…

    • Switch to Design view and you should see the new cells in one of the footer rows.
    • Click in the cell where you want the total
    • Right-click and select Insert Formula
    • Build your formula. For a total double click "sum" in the function list then select your field from the dropdown list. My example needed: sum(@Retail)
    • The formula editor does not know one extra piece of information needed here. The @Retail field needs to come from the current group only. To get this, update the formula like this: sum($nodeset/@Retail) ("nodeset" is all lower case)
      Tip: How would you have discovered this? Go look at how they calculated the Count: count($nodeset).
    • Notice that the formatting is wrong. The total is left aligned and the wrong size. To match the font and size find the style used for the data in the row above. In my example it looked like this: <TD Class="{$IDADW3HE}">
    • Copy the class info (Class="{$IDADW3HE}") into your total cell (the TD tag). The result will look something like this:
      <td Class="{$IDADW3HE}"><xsl:value-of select="sum(@Retail)" /></td>
    • The last step is to right align the cell (you can use the toolbar button) and to format the total. To format the number, click in the cell with the total, right-click and select Format Item As… and pick your formatting options.
    • Note: SharePoint Designer may get creative and merge your formatting in new styles with great names like style1, style2, style3 etc.. If you are curious, do a search for .style1 (dot style1) and you will find they have placed the style class definition in the PlaceHolderBodyAreaClass master page placeholder.
  • Fix up each footer row, including the View Footer, the same way. Add the extra TDs, add the totals, counts, etc, and format the results.

    Now about the View Footer… and some things to make your head hurt…

                 image

    • The View Footer is built in its own HTML table, so the column widths are not going to line up with the rest of the list. (I'll have to come back with another article to make these line up correctly).
    • The grand totals need a special calculation to sum all of the rows. The @Retail field (or @yourfield) needs to come from the entire set of rows. To get this, update the formula like this: sum(/dsQueryResponse/Rows/Row/@yourfield) (make sure the capitalization is correct!)
      Tip: How would you have discovered this? Go look at how they calculated the Count for the View Footer: count(/dsQueryResponse/Rows/Row) .

       Finally all done!

      A lot of steps, but it's a fairly routine and mechanical process. Do it a few times and you to will be able to amaze your fellow site owners!
      Hopefully the next version of SharePoint (2014?) will support more than two levels of grouping. Then we can all brag: "Back in the old days I had to … "   

      BUG!!!

      There is a grouping bug in the Data Form Web Part… read the comments at the end of the original article for details. I hope to revisit that issue for 2010 shortly. If you want to go exploring in the mean time, here’s the fix for 2007.


      .
    • 6/18/2012

      SharePoint: Attachments to list items do not appear in search results???


      True or Not?

      Microsoft's documentation for SharePoint Server 2010 states "Attachments to list items do not appear in search results" in both the site's help form (screen below) and the online documentation. But in my tests I can find documents that are list attachments!

      The SharePoint Server 2010 help page:
          image 


      My Test

      The attachment in my test:

          image

      The search results showing the attachment contents:

          image


      Homework assignment!

      I've always been able to search for and find attachments, but as I'm working on a little book on SharePoint search I want to make sure I'm right and the documentation is wrong! Will you check this in your installation and post back what you find? Just create a Word document with a unique term, attach it to a list item and wait until your content is indexed. To confirm that the content has been indexed you may want to also upload the same file to a library in the same site and then check search for both copies.

      If you post back, please list:

      • SharePoint version: 2007, 2010, SharePoint Online (Office 365)
      • SharePoint edition: 
        2007: WSS, MOSS Standard, MOSS Enterprise
        2010: Foundation, Server Standard, Server Enterprise
        or the Office 365 subscription.
      • Service Pack level if you know it, or the version

      Thanks,
      Mike

      .

      6/16/2012

      SharePoint 2010–Fun with Scrollbars!

      Please, please, please… I'm not starting a debate on the pros and cons of scrollbars!   Smile   I'm just showing how to add them if you need them…

      The following is for SharePoint 2010 and Office 365 / SharePoint Online.

      Change How the Page Scrollbars Work

      SharePoint uses JavaScript to make sure the ribbon stays at the top of the page. This results in the ribbon staying fixed, but also means that we have a custom scrolling area below the ribbon. If you prefer more natural scrollbars then take a look at Kyle Schaeffer's article here: http://kyleschaeffer.com/sharepoint/sharepoint-2010-scrolling/

      Below is the before and after of Kyle's changes. While the cosmetic changes are minor, Kyle lists additional benefits in his article.

          image


      Add Scrollbars to Quick Launch

      Note: If you just want to tighten up the Quick Launch area then see this article: http://techtrainingnotes.blogspot.com/2011/10/sharepoint-2010-365-tighten-up-quick.html

      When you scroll down in a SharePoint page to find what's at the end of the Quick Launch area you also scroll the top navigation area out of site. This area has the site title, top link bar, search and the Tags and Notes buttons. To be able to browse the Quick Launch area without scrolling the entire page add this CSS to your master page:

      .ms-quicklaunch-navmgr
      {
          overflow-y:scroll;
          height:200px;
      }

      You will need to carefully select the height property and/or write some JavaScript to set the height based on the user's browser settings.

          image 

      If you want to scroll the entire left navigation area then use this CSS:

      #s4-leftpanel-content
      {
          overflow-y:scroll;
          height:300px;
      }

          image

      Setting the height of this area gives you a little bonus of adding text or links just below the navigation area. Search for "MSO_ContentTable" in your master page and place your content between the two "</div>" tags above this line. (This example is for the standard v4.master page. Yours may be different.)

          image


      Add Scrollbars to the Content Area of the Page

      If you would like to always leave the Navigation area on the left side of the page and the title area on the top of the page you will need add scroll bars to the primary content area ("ms-bodyareacell"). You will need to carefully select the height property and/or write some JavaScript to set the height based on the user's browser settings.

      .ms-bodyareacell
      {
          overflow-y:scroll;
          height:400px;
      }

      image


      Add Scrollbars to a Web Part

      This one is easy as it can be done from the web part's properties panel. Just click the web part's dropdown menu, click Edit, expand the Appearance section and enter the height.

          image

      Here's the result:

          image

      If you really want to force a web part or all web parts to display at a fixed size you could set the .ms-wpContentDivSpace class. Most likely you will want to do this at a single page level instead of in the master page.

      .ms-wpContentDivSpace
      {
          height:200px;
      }

      If you want to change the height of a single web part then view the source of the page and search for "#MSOZoneCell_WebPartWPQ" until you find your web part. Copy the name that you find there, including the digit at the end and add it to your style selector.

      #MSOZoneCell_WebPartWPQ5 .ms-wpContentDivSpace
      {
          height:200px;
      }

      .

      6/10/2012

      SharePoint Saturday Dayton 2012 in Three Weeks!


      It's less than three weeks to the very first SharePoint Saturday Dayton event. Twenty sessions and twenty speakers means that there's something for everyone… admins, devs, site owners, business owners, and end users. Oh, and don't forget SharePoint Saturday Louisville and SharePoint Saturday Cincinnati coming up in July and October.

      Reasons to attend SharePoint Saturday Dayton:

      • It's free
      • It's educational
      • You can visit with (and thank) the sponsors
      • It's free
      • There's sessions for everyone
      • You can hobnob with the experts (and maybe get some free consulting)
      • There's door prizes
      • It's air-conditioned
      • It's near by
      • I'm speaking there! (ok, there are better reasons to attend…)
      • Did I mention it's free?

      Sessions, speakers, directions and registration can be found here:
      http://www.sharepointsaturday.org/dayton/default.aspx

      Stay up with SPS Dayton news by following: @spsdayton

      Speakers and Sessions:

      Visit the site for full session descriptions.

      • Bateman, Leanne
        Session:  Project Management: The Key to Successful User Adoption on SharePoint Projects
      • Bramer, Matt
        Session: The Alphabet Soup of Front-End Development:
        (XML/XSLT/XPath/jQuery/JavaScript/SPServices/CSS/(X)HTML/CAML/ClientOM)
      • Brandon, Fred
        Session: SharePoint Lists & Libraries – Basic Necessities for the New Site Owner
      • Brook, Douglas J
        Session: Reducing Organizational Risk through the Automatic Application of Metadata & Policies in SharePoint 2010
      • Caldwell, Michelle
        Session: Building A Roadmap for SharePoint Success
      • Carroll, Virgil
        Session: Putting the User back in SharePoint UI
      • Deere, Stacy
        Session: Good vs. Evil; Customizing your site without going to …. Well, you get the point!
      • Donahue, Stephanie
        Session: Developers? Who needs em….DIY SharePoint enhancements for Admins
      • Earley, Seth
        Session: User Centric Design – How to Leverage Use Cases and User Scenarios to Design SharePoint Functionality
      • Ferringer, John
        Session: Everybody Lies: Troubleshooting SharePoint Issues with House M.D.
      • Grizzle, James
        Session: Wrangling the User Profile Service
      • Hoag, Scott
        Session: Building a SharePoint Platform that Scales
      • Keller, Jason
        Session: Building Out of the Box Solutions
      • Mast, Jonathan
        Session: Building Rich SharePoint User Experiences with JQuery
      • McDonough, Sean
        Session:  Hypermiling with SharePoint Data Protection
      • Moneypenny, Naomi
        Session:Communicating SharePoint Up, Down and All Around
      • Smith, Mike
        Session: Exploring and Auditing SharePoint Using PowerShell
      • Tucker, Patrick
        Session: Reduce ReUse and Recycle with Content Types
      • Usher, Dan
        Session: Scott (MCITP, MCPD) is an Infrastructure
      • Wing, Arnulfo
        Session: SharePoint Security Testing – Automated


      .

      Note to spammers!

      Spammers, don't waste your time... all posts are moderated. If your comment includes unrelated links, is advertising, or just pure spam, it will never be seen.